Creating an Interactive World Map: Leaflet.js
Introduction
I’ve played Dungeons and Dragons as a player for quite a while. But when the latest adventure was coming to a close, I stepped up to the plate to run a campaign in my own setting!
I really wanted to give my players a world map akin to Google Maps for the world. Allowing them to explore the world from a new angle with map markers for towns and cities. Initially, I couldn’t find anything that fit the build until I discovered Leaflet.js (which is even mobile-friendly).
If you’re wanting to see the end results of the project, you can see the map and code at the bottom of this post. This guide involves a little coding, but it’s all detailed below. The only other pre-requisite needed is a copy of Photoshop (any version higher than CS2 will work for our needs).
Preparing your map
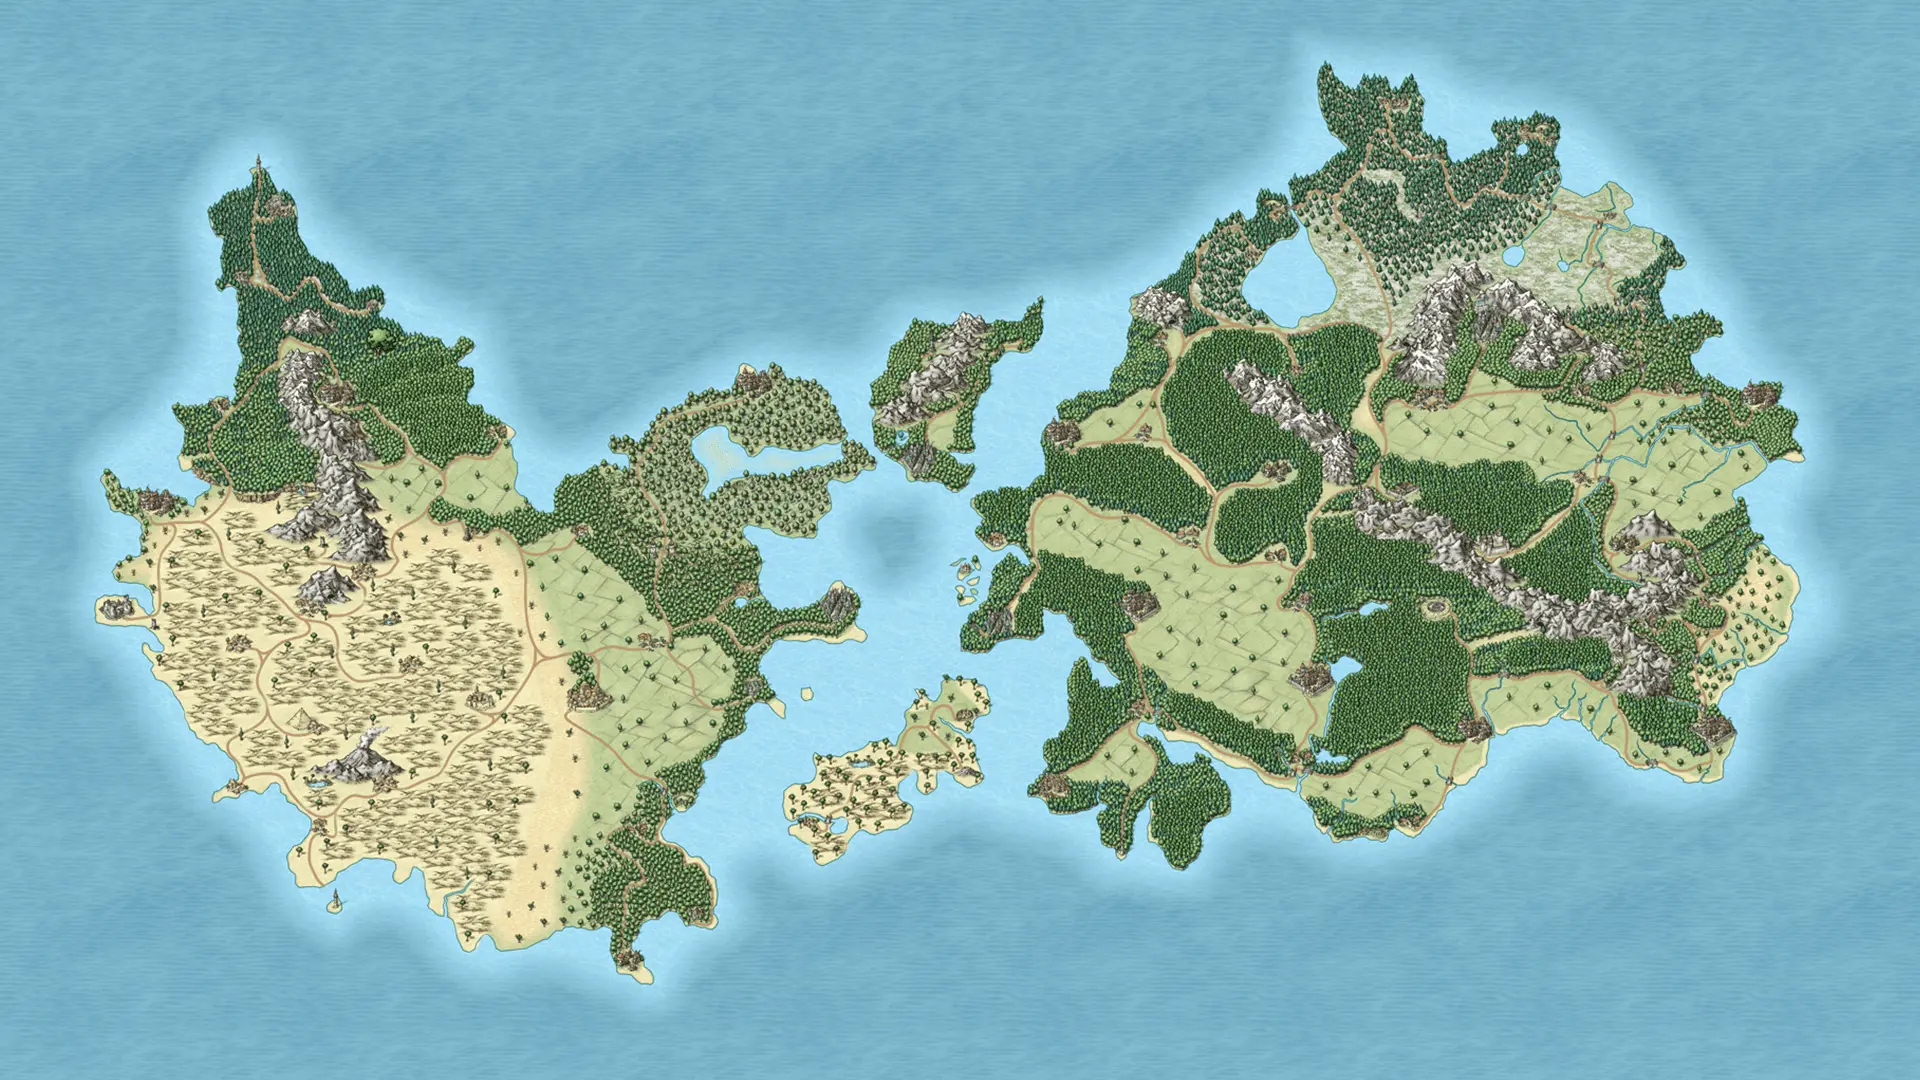
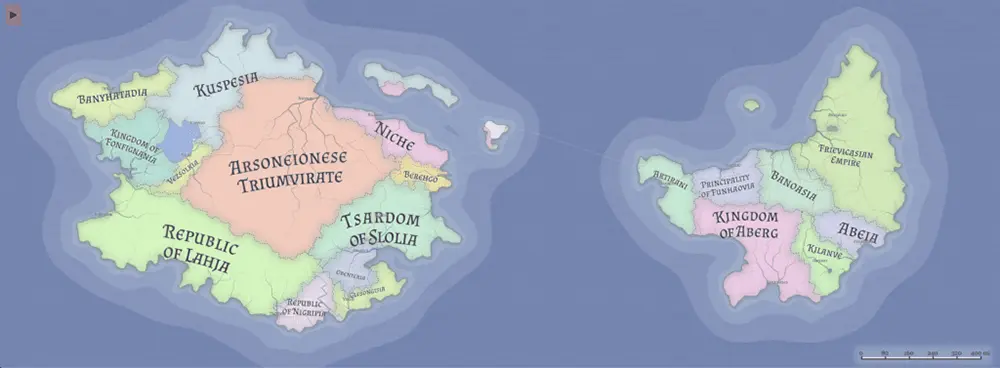
For this guide, I’m going to assume that you’ve already got a world map ready to work on! If you don’t, you can generate lovely looking maps on Azgaar’s Fantasy Map Generator. Which is how mine started out!
For this tutorial, your map will need to be converted from a single image map into a collection of tiles. This serves two purposes, saving bandwidth and providing images for the different zoom levels, as we need less resolution when zoomed out.
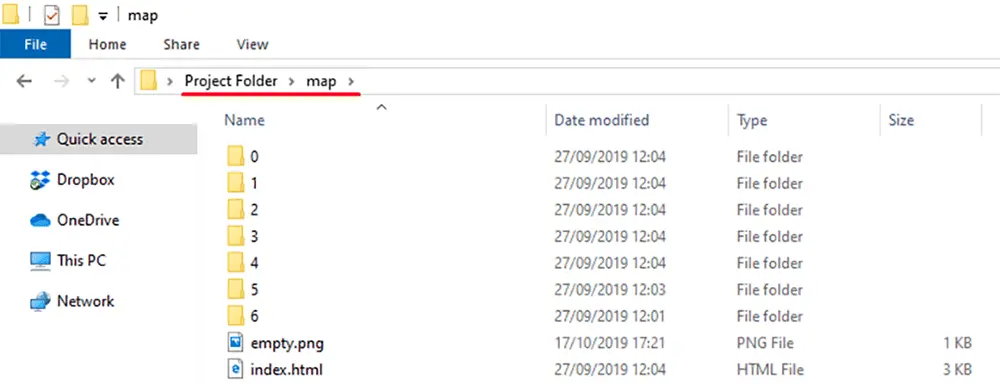
Before starting any of the below, I highly recommend creating a project folder. This folder will contain everything needed for the finished map to be uploaded to wherever you’re planning to host it!
To create the tiles, use the photoshop-google-maps-tile-cutter script by bramus. This script is straightforward to use but will take a while, depending on the size of your map.
Other than the export path, you’ll want the script export settings to match the settings below. I recommend settings the background colour to match the colour you’re using for water.
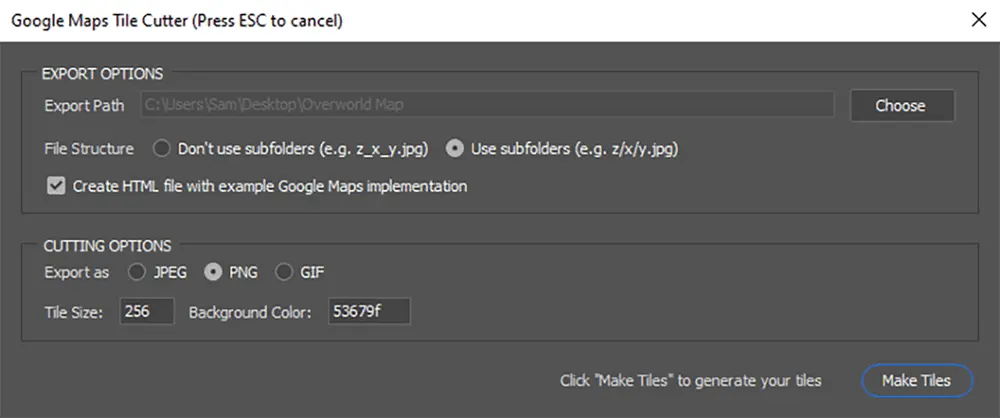
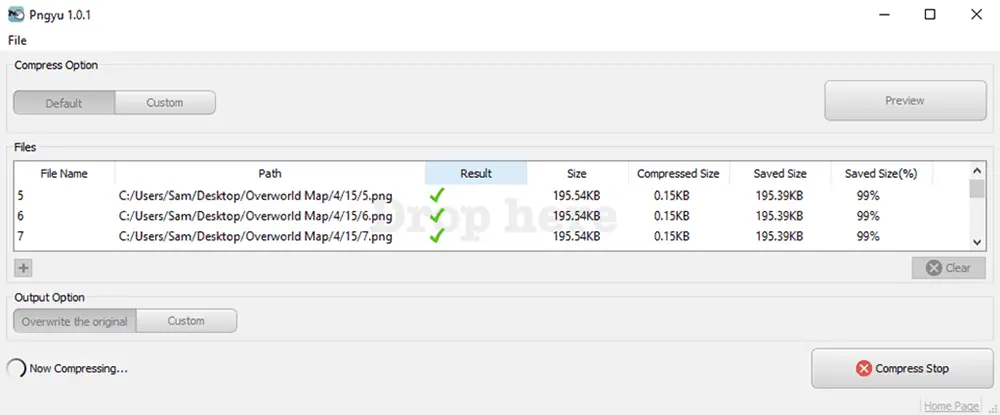
This Photoshop script also creates a Google Maps version of the image. But this no longer works because of changes to Google’s map API. After you’ve created all of your tiles, you’ll want to run the end results through an image optimiser. Reducing the size of the images without perceptible quality reduction. For this, I used PNGYU (which is based on pngquant), mainly because it allows batch compressing, whilst maintaining the existing folder structure.
To accomplish this batch compression, drag the tile output folder into PNGYU. Set the Compress Option to ‘Default’, and the Output Option to ‘Overwrite the original’
Once the compression has completed, put the result into its own folder within the project folder. For ease when following this guide, I recommend naming this folder map so it matches my code.
Setting up Leaflet.js
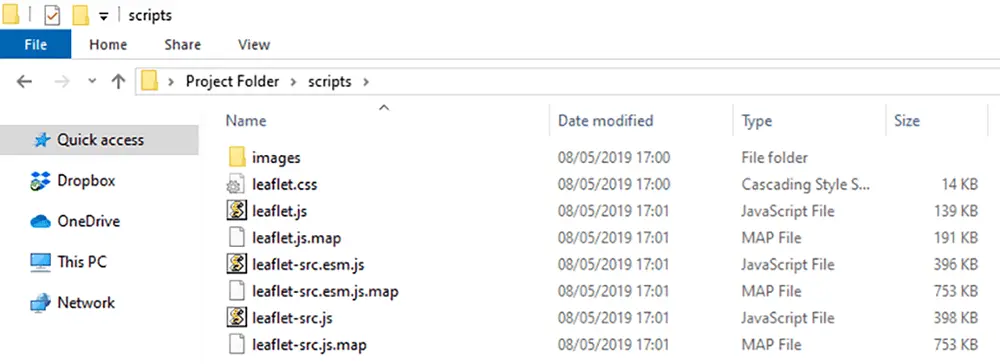
With your compressed map tiles, it’s time to get started with Leaflet.js. First, download the latest version of the Leaflet Library here. Unzip the download and put the output into a new folder called scripts within your project folder.
You can now code the map itself. You can use any text editor, but I recommend using Notepad++ or VS Code. Create a new file in your project folder and name it index.html. Copy the below code into the file and change the background value to match the colour you used earlier.
<!DOCTYPE html>
<html = style="height: 100%;">
  <head>
    <title>DnD World Map</title>
    <meta name="viewport" content="width=device-width, initial-scale=1.0">
    <link rel="stylesheet" href="scripts/leaflet.css">
    <script src="scripts/leaflet.js"></script>
  </head>

  <body style="height: 100%;margin: 0;">
    <div id="map" style="width: 100%; height: 100%; background: #000000;"></div>
    <script type="text/javascript">
  //Creating the Map
    var map = L.map('map').setView([0, 0], 0);
    L.tileLayer('map/{z}/{x}/{y}.png', {
      continuousWorld: false,
      noWrap: true,
      minZoom: 0,
      maxZoom: 10,
    }).addTo(map);
  //Coordinate Finder
    var marker = L.marker([0, 0], {
      draggable: true,
    }).addTo(map);
    marker.bindPopup('LatLng Marker').openPopup();
    marker.on('dragend', function(e) {
      marker.getPopup().setContent(marker.getLatLng().toString()).openOn(map);
    });
  //Markers
    </script>
  </body>
</html>
If you save this file and open it in your browser, you’ll be greeted by your map! However, there are a couple of variables to adjust depending on your map’s original resolution.
For me, the Photoshop Script created folders from 0 to 6 – which correspond to different zoom levels. Your index.html file will open to your map at zoom level 0, which for me was far too zoomed out! To fix this, I changed the minZoom variable to 3—which corresponds to pressing the + button 3 times. Adjust this until you are happy with the minimum zoom value.
If you press the + button several more times, your map will disappear completely. This is because you can only zoom in the number of folders available. To fix this, you will want to set your maxZoom to the highest folder number—for me, this valve is 6. But, if you don’t like how close you can zoom in, you can decrease this number.
After you’re happy with the minimum and maximum zoom, you can safely remove the folders outside of this range. This is to avoid uploading unnecessary files being uploaded to wherever you’re hosting your map.
Creating Markers
Now that you’ve added and configured your map in Leaflet.js, it’s time to add some markers! You’ll notice that there is already one marker in the centre of your map named LatLng. You will use this to create additional markers.

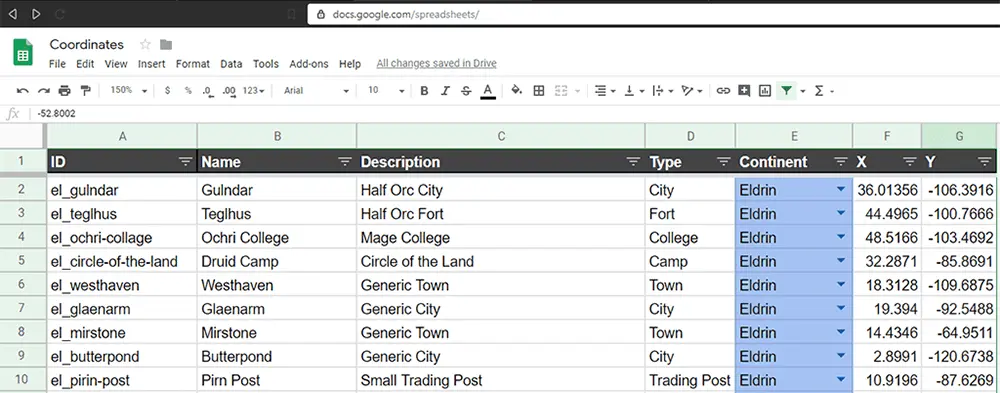
For this section, I recommend creating a spreadsheet to list all of your different towns and places that you want to put markers on. The spreadsheet should include:
- A unique ID
- X Coordinate (First number in bracket)
- Y Coordinate (Second number in bracket)
Drag the marker around the map and make a note of the X and Y coordinates, and give each location a unique ID. I went from east to west across my map to make sure I collated all places. Don’t worry if you miss any, you can come back and add them later!
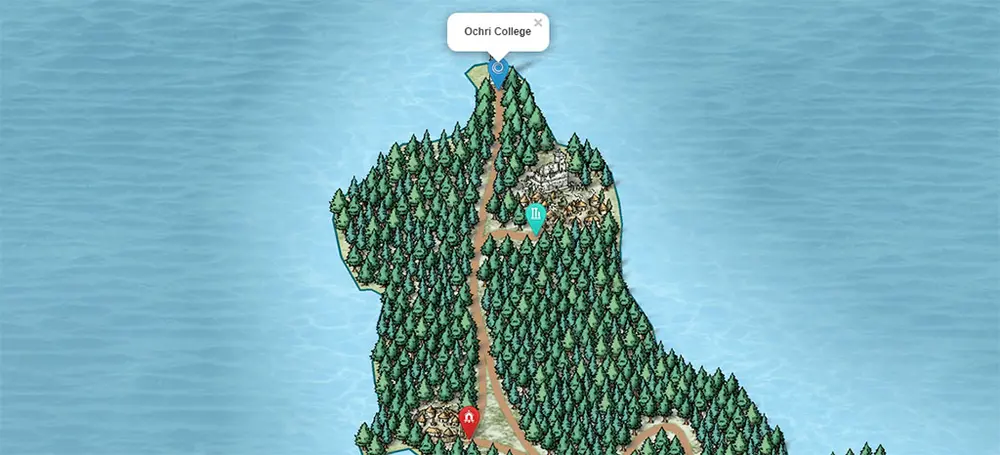
After creating this list of your markers/waypoints, you can add them to the map! You will need to add a line of code for each marker. I recommend adding them underneath //Markers in the HTML file. Here are several examples from my map from the above spreadsheet.
var el_gulndar = L.marker([36.0135, -106.3916]).bindPopup('<b>Gulndar</b>').addTo(map);
var el_teglhus = L.marker([44.4965, -100.7666]).bindPopup('<b>Teglhus</b>').addTo(map);
var el_ochri_college = L.marker([48.5166,-103.4692]).bindPopup('<b>Ochri College</b>').addTo(map);
When viewed with the above code included, my map now shows the three markers on my world map as pictured below, which when clicked, show the entered location's name.
The generic syntax for creating these markers is as follows, with the words in capitals needing to be changed.
var UNIQUE ID = L.marker([X VALUE, Y VALUE]).bindPopup('PLACE NAME').addTo(map)After you’re happy that you have all of your markers in the right place and working, you can delete the text between //Coordinate Finder and //Markers. This is because the LatLng finder is no longer needed.
Grouping Markers
Reloading your map you might find it looks messy, with lots of markers covering it. This is where grouping markers together is extremely useful!
The first stage to group your markers will be to remove some code from each marker. Currently, your markers include .addTo(map). This means that the marker will always be visible. Remove .addTo(map) from all markers, but leave the ; at the end of each line. Reloading your map you will see your markers have disappeared.
How you decide to group your markers is entirely up to you, I used the following categories:
- Mage Colleges
- Trading Posts
- Cities
- Towns
- Forts/Castles
- Temples
Once you have decided on the groups to use, you need to create group variables for each. At the bottom of your marker section, add the following code, with the values to change in capitals:
//Marker Groups
    var mg_GROUPNAME = L.layerGroup([LIST,OF,MARKERS]);
    var mg_ANOTHERGROUP = L.layerGroup([SOME,MORE,PLACES]);
//Marker Overlay
    var overlays={
        "GROUPNAME" : mg_GROUPNAME,
        "ANOTHERGROUP" : mg_ANOTHERGROUP,
    }
//GROUP CONTROLS
    L.control.layers(null, overlays).addTo(map);
Below is an extract of my code with these variables filled in:
//Markers
  var el_gulndar = L.marker([36.4919, -114.038]).bindPopup('<b>Gulndar</b>');
  var el_teglhus = L.marker([45.3058, -108.413]).bindPopup('<b>Teglhus</b>');
  var el_ochri_college = L.marker([48.5166,-111.2255]).bindPopup('<b>Ochri College</b>');
//Marker Groups
  var mg_towns = L.layerGroup([el_gulndar,el_teglhus]);
  var mg_towers = L.layerGroup([el_ochri_college]);
//Marker Overlay
  var overlays={
    "Towns" : mg_towns,
    "Towers" : mg_towers,
    }
//GROUP CONTROLS
  L.control.layers(null, overlays).addTo(map);
When you now load your map, no markers will appear, but there is now a menu in the top right. Use this menu to hide and show your created marker groups.
Custom Marker Icons
Happy with my initial map, I was looking through the documentation for ways to personalise it further, and found out I could add custom markers easily! As this is something I found gave my map some extra polish, I wanted to share it.
Before adding custom markers to my map, I needed to create them. I used the existing marker as a template for size and format and created a range of different icons in Photoshop which you can see at the bottom of this post.
Leaflet’s documentation is great and the process for adding custom markers was straightforward. Once you’ve designed your icon set, place them in an icons folder in your project folder. You will then want to add the following segment of code for each icon, changing the capitalised word to your icon’s name:
	var ICONNAME = L.icon({
		iconUrl:       'icons/ICONNAME.png',
		iconRetinaUrl: 'icons/ICONNAME.png',
		shadowUrl:     'scripts/images/marker-shadow.png',
		iconSize:    [25, 41],
		iconAnchor:  [12, 41],
		popupAnchor: [1, -34],
		tooltipAnchor: [16, -28],
		shadowSize:  [41, 41]
	});
To use your newly created markers, you will need to adjust each L.marker code to change to the custom icon. To do this you will want to add , {icon: ICONNAME} to your code as shown in the below example:
var cityGlaenarm = L.marker([-113.859375, 57.28125], {icon: city}).bindPopup("<b>Glaenarm</b>");Hosting your Map
For my group’s campaign map, I’m hosting it on my local Unraid server. But you can upload your project folder to any web host of your choosing, or even setup a github.io page like I have done here.
If you want to embed your world map in a webpage, similar to the below example, you can include it using an iframe with the following code:
<iframe src="https://URL_TO_INDEX.HTML" width="100%" height="600"></iframe>This project has been something I was really happy to complete. After nearly giving up, I am extremely happy that I found Leaflet.js! Some of the above can be a little confusing, so if you have questions, drop a comment below and I’d be more than happy to answer them!
Project Result
Project Code
<!DOCTYPE html>
<html = style="height: 100%;">
  <head>
    <title>Adventures in Oakla: World Map</title>
    <meta name="viewport" content="width=device-width, initial-scale=1.0">
    <link rel="stylesheet" href="scripts/leaflet.css">
    <script src="scripts/leaflet.js"></script>
	<link rel="stylesheet" href="scripts/L.Control.BetterScale.css" />
	<script src="scripts/L.Control.BetterScale.js"></script>
  </head>

  <body style="height: 100%;margin: 0;">
    <div id="map" style="width: 100%; height: 100%; background: #73acc3;"></div>
    <script type="text/javascript">

  //Creating the Map
    var map = L.map('map', {crs: L.CRS.Simple}).setView([0, 0], 0);
    L.tileLayer('map/{z}/{x}/{y}.png', {
      continuousWorld: false,
      noWrap: true,
      minZoom: 3,
      maxZoom: 4,
    }).addTo(map);

	map.setView( [-130.25, 123.8], 1);
  //Boundaries Variables
    var mapSW = [-210,255], mapNE = [-55,10];
	map.setMaxBounds(new L.LatLngBounds(mapSW, mapNE));

  //Icons
	var city = L.icon({
		iconUrl:       'icons/city.png',
		iconRetinaUrl: 'icons/city.png',
		shadowUrl:     'icons/shadow.png',
		iconSize:    [25, 41],
		iconAnchor:  [12, 41],
		popupAnchor: [1, -34],
		tooltipAnchor: [16, -28],
		shadowSize:  [41, 41]
	});
	var cityBarbarian = L.icon({
		iconUrl:       'icons/cityBarbarian.png',
		iconRetinaUrl: 'icons/cityBarbarian.png',
		shadowUrl:     'icons/shadow.png',
		iconSize:    [25, 41],
		iconAnchor:  [12, 41],
		popupAnchor: [1, -34],
		tooltipAnchor: [16, -28],
		shadowSize:  [41, 41]
	});
 	var cityCapital = L.icon({
		iconUrl:       'icons/cityCapital.png',
		iconRetinaUrl: 'icons/cityCapital.png',
		shadowUrl:     'icons/shadow.png',
		iconSize:    [25, 41],
		iconAnchor:  [12, 41],
		popupAnchor: [1, -34],
		tooltipAnchor: [16, -28],
		shadowSize:  [41, 41]
	});
	var cityDruid = L.icon({
		iconUrl:       'icons/cityDruid.png',
		iconRetinaUrl: 'icons/cityDruid.png',
		shadowUrl:     'icons/shadow.png',
		iconSize:    [25, 41],
		iconAnchor:  [12, 41],
		popupAnchor: [1, -34],
		tooltipAnchor: [16, -28],
		shadowSize:  [41, 41]
	});
	var cityDwarves = L.icon({
		iconUrl:       'icons/cityDwarves.png',
		iconRetinaUrl: 'icons/cityDwarves.png',
		shadowUrl:     'icons/shadow.png',
		iconSize:    [25, 41],
		iconAnchor:  [12, 41],
		popupAnchor: [1, -34],
		tooltipAnchor: [16, -28],
		shadowSize:  [41, 41]
	});
	var cityElves = L.icon({
		iconUrl:       'icons/cityElves.png',
		iconRetinaUrl: 'icons/cityElves.png',
		shadowUrl:     'icons/shadow.png',
		iconSize:    [25, 41],
		iconAnchor:  [12, 41],
		popupAnchor: [1, -34],
		tooltipAnchor: [16, -28],
		shadowSize:  [41, 41]
	});
 	var cityHalflings = L.icon({
		iconUrl:       'icons/cityHalflings.png',
		iconRetinaUrl: 'icons/cityHalflings.png',
		shadowUrl:     'icons/shadow.png',
		iconSize:    [25, 41],
		iconAnchor:  [12, 41],
		popupAnchor: [1, -34],
		tooltipAnchor: [16, -28],
		shadowSize:  [41, 41]
	});
	var cityLizard = L.icon({
		iconUrl:       'icons/cityLizard.png',
		iconRetinaUrl: 'icons/cityLizard.png',
		shadowUrl:     'icons/shadow.png',
		iconSize:    [25, 41],
		iconAnchor:  [12, 41],
		popupAnchor: [1, -34],
		tooltipAnchor: [16, -28],
		shadowSize:  [41, 41]
	});
	var cityPort = L.icon({
		iconUrl:       'icons/cityPort.png',
		iconRetinaUrl: 'icons/cityPort.png',
		shadowUrl:     'icons/shadow.png',
		iconSize:    [25, 41],
		iconAnchor:  [12, 41],
		popupAnchor: [1, -34],
		tooltipAnchor: [16, -28],
		shadowSize:  [41, 41]
	});
	var fort = L.icon({
		iconUrl:       'icons/fort.png',
		iconRetinaUrl: 'icons/fort.png',
		shadowUrl:     'icons/shadow.png',
		iconSize:    [25, 41],
		iconAnchor:  [12, 41],
		popupAnchor: [1, -34],
		tooltipAnchor: [16, -28],
		shadowSize:  [41, 41]
	});
 	var fortTower = L.icon({
		iconUrl:       'icons/fortTower.png',
		iconRetinaUrl: 'icons/fortTower.png',
		shadowUrl:     'icons/shadow.png',
		iconSize:    [25, 41],
		iconAnchor:  [12, 41],
		popupAnchor: [1, -34],
		tooltipAnchor: [16, -28],
		shadowSize:  [41, 41]
	});
	var mageTower = L.icon({
		iconUrl:       'icons/mageTower.png',
		iconRetinaUrl: 'icons/mageTower.png',
		shadowUrl:     'icons/shadow.png',
		iconSize:    [25, 41],
		iconAnchor:  [12, 41],
		popupAnchor: [1, -34],
		tooltipAnchor: [16, -28],
		shadowSize:  [41, 41]
	});
	var poiBramble = L.icon({
		iconUrl:       'icons/poiBramble.png',
		iconRetinaUrl: 'icons/poiBramble.png',
		shadowUrl:     'icons/shadow.png',
		iconSize:    [25, 41],
		iconAnchor:  [12, 41],
		popupAnchor: [1, -34],
		tooltipAnchor: [16, -28],
		shadowSize:  [41, 41]
	});
	var poiCave = L.icon({
		iconUrl:       'icons/poiCave.png',
		iconRetinaUrl: 'icons/poiCave.png',
		shadowUrl:     'icons/shadow.png',
		iconSize:    [25, 41],
		iconAnchor:  [12, 41],
		popupAnchor: [1, -34],
		tooltipAnchor: [16, -28],
		shadowSize:  [41, 41]
	});
 	var poiMine = L.icon({
		iconUrl:       'icons/poiMine.png',
		iconRetinaUrl: 'icons/poiMine.png',
		shadowUrl:     'icons/shadow.png',
		iconSize:    [25, 41],
		iconAnchor:  [12, 41],
		popupAnchor: [1, -34],
		tooltipAnchor: [16, -28],
		shadowSize:  [41, 41]
	});
	var poiRuin = L.icon({
		iconUrl:       'icons/poiRuin.png',
		iconRetinaUrl: 'icons/poiRuin.png',
		shadowUrl:     'icons/shadow.png',
		iconSize:    [25, 41],
		iconAnchor:  [12, 41],
		popupAnchor: [1, -34],
		tooltipAnchor: [16, -28],
		shadowSize:  [41, 41]
	});
	var poiWaterfall = L.icon({
		iconUrl:       'icons/poiWaterfall.png',
		iconRetinaUrl: 'icons/poiWaterfall.png',
		shadowUrl:     'icons/shadow.png',
		iconSize:    [25, 41],
		iconAnchor:  [12, 41],
		popupAnchor: [1, -34],
		tooltipAnchor: [16, -28],
		shadowSize:  [41, 41]
	});
	var templeCathedral = L.icon({
		iconUrl:       'icons/templeCathedral.png',
		iconRetinaUrl: 'icons/templeCathedral.png',
		shadowUrl:     'icons/shadow.png',
		iconSize:    [25, 41],
		iconAnchor:  [12, 41],
		popupAnchor: [1, -34],
		tooltipAnchor: [16, -28],
		shadowSize:  [41, 41]
	});
 	var templeEldath = L.icon({
		iconUrl:       'icons/templeEldath.png',
		iconRetinaUrl: 'icons/templeEldath.png',
		shadowUrl:     'icons/shadow.png',
		iconSize:    [25, 41],
		iconAnchor:  [12, 41],
		popupAnchor: [1, -34],
		tooltipAnchor: [16, -28],
		shadowSize:  [41, 41]
	});
	var templeMonolith = L.icon({
		iconUrl:       'icons/templeMonolith.png',
		iconRetinaUrl: 'icons/templeMonolith.png',
		shadowUrl:     'icons/shadow.png',
		iconSize:    [25, 41],
		iconAnchor:  [12, 41],
		popupAnchor: [1, -34],
		tooltipAnchor: [16, -28],
		shadowSize:  [41, 41]
	});
	var templePyramid = L.icon({
		iconUrl:       'icons/templePyramid.png',
		iconRetinaUrl: 'icons/templePyramid.png',
		shadowUrl:     'icons/shadow.png',
		iconSize:    [25, 41],
		iconAnchor:  [12, 41],
		popupAnchor: [1, -34],
		tooltipAnchor: [16, -28],
		shadowSize:  [41, 41]
	});
	var templeShrine = L.icon({
		iconUrl:       'icons/templeShrine.png',
		iconRetinaUrl: 'icons/templeShrine.png',
		shadowUrl:     'icons/shadow.png',
		iconSize:    [25, 41],
		iconAnchor:  [12, 41],
		popupAnchor: [1, -34],
		tooltipAnchor: [16, -28],
		shadowSize:  [41, 41]
	});
 	var templeZiggurat = L.icon({
		iconUrl:       'icons/templeZiggurat.png',
		iconRetinaUrl: 'icons/templeZiggurat.png',
		shadowUrl:     'icons/shadow.png',
		iconSize:    [25, 41],
		iconAnchor:  [12, 41],
		popupAnchor: [1, -34],
		tooltipAnchor: [16, -28],
		shadowSize:  [41, 41]
	});
	var town = L.icon({
		iconUrl:       'icons/town.png',
		iconRetinaUrl: 'icons/town.png',
		shadowUrl:     'icons/shadow.png',
		iconSize:    [25, 41],
		iconAnchor:  [12, 41],
		popupAnchor: [1, -34],
		tooltipAnchor: [16, -28],
		shadowSize:  [41, 41]
	});
	var townBarbarian = L.icon({
		iconUrl:       'icons/townBarbarian.png',
		iconRetinaUrl: 'icons/townBarbarian.png',
		shadowUrl:     'icons/shadow.png',
		iconSize:    [25, 41],
		iconAnchor:  [12, 41],
		popupAnchor: [1, -34],
		tooltipAnchor: [16, -28],
		shadowSize:  [41, 41]
	});
	var townDock = L.icon({
		iconUrl:       'icons/townDock.png',
		iconRetinaUrl: 'icons/townDock.png',
		shadowUrl:     'icons/shadow.png',
		iconSize:    [25, 41],
		iconAnchor:  [12, 41],
		popupAnchor: [1, -34],
		tooltipAnchor: [16, -28],
		shadowSize:  [41, 41]
	});
 	var townDruid = L.icon({
		iconUrl:       'icons/townDruid.png',
		iconRetinaUrl: 'icons/townDruid.png',
		shadowUrl:     'icons/shadow.png',
		iconSize:    [25, 41],
		iconAnchor:  [12, 41],
		popupAnchor: [1, -34],
		tooltipAnchor: [16, -28],
		shadowSize:  [41, 41]
	});
	var townDwarves = L.icon({
		iconUrl:       'icons/townDwarves.png',
		iconRetinaUrl: 'icons/townDwarves.png',
		shadowUrl:     'icons/shadow.png',
		iconSize:    [25, 41],
		iconAnchor:  [12, 41],
		popupAnchor: [1, -34],
		tooltipAnchor: [16, -28],
		shadowSize:  [41, 41]
	});
	var townElves = L.icon({
		iconUrl:       'icons/townElves.png',
		iconRetinaUrl: 'icons/townElves.png',
		shadowUrl:     'icons/shadow.png',
		iconSize:    [25, 41],
		iconAnchor:  [12, 41],
		popupAnchor: [1, -34],
		tooltipAnchor: [16, -28],
		shadowSize:  [41, 41]
	});
	var townHalflings = L.icon({
		iconUrl:       'icons/townHalflings.png',
		iconRetinaUrl: 'icons/townHalflings.png',
		shadowUrl:     'icons/shadow.png',
		iconSize:    [25, 41],
		iconAnchor:  [12, 41],
		popupAnchor: [1, -34],
		tooltipAnchor: [16, -28],
		shadowSize:  [41, 41]
	});
 	var townLizard = L.icon({
		iconUrl:       'icons/townLizard.png',
		iconRetinaUrl: 'icons/townLizard.png',
		shadowUrl:     'icons/shadow.png',
		iconSize:    [25, 41],
		iconAnchor:  [12, 41],
		popupAnchor: [1, -34],
		tooltipAnchor: [16, -28],
		shadowSize:  [41, 41]
	});
	var townMill = L.icon({
		iconUrl:       'icons/townMill.png',
		iconRetinaUrl: 'icons/townMill.png',
		shadowUrl:     'icons/shadow.png',
		iconSize:    [25, 41],
		iconAnchor:  [12, 41],
		popupAnchor: [1, -34],
		tooltipAnchor: [16, -28],
		shadowSize:  [41, 41]
	});
	var tradeCamp = L.icon({
		iconUrl:       'icons/tradeCamp.png',
		iconRetinaUrl: 'icons/tradeCamp.png',
		shadowUrl:     'icons/shadow.png',
		iconSize:    [25, 41],
		iconAnchor:  [12, 41],
		popupAnchor: [1, -34],
		tooltipAnchor: [16, -28],
		shadowSize:  [41, 41]
	});
	var tradeCampLarge = L.icon({
		iconUrl:       'icons/tradeCampLarge.png',
		iconRetinaUrl: 'icons/tradeCampLarge.png',
		shadowUrl:     'icons/shadow.png',
		iconSize:    [25, 41],
		iconAnchor:  [12, 41],
		popupAnchor: [1, -34],
		tooltipAnchor: [16, -28],
		shadowSize:  [41, 41]
	});
 	var tradeForge = L.icon({
		iconUrl:       'icons/tradeForge.png',
		iconRetinaUrl: 'icons/tradeForge.png',
		shadowUrl:     'icons/shadow.png',
		iconSize:    [25, 41],
		iconAnchor:  [12, 41],
		popupAnchor: [1, -34],
		tooltipAnchor: [16, -28],
		shadowSize:  [41, 41]
	});
	var tradeHunter = L.icon({
		iconUrl:       'icons/tradeHunter.png',
		iconRetinaUrl: 'icons/tradeHunter.png',
		shadowUrl:     'icons/shadow.png',
		iconSize:    [25, 41],
		iconAnchor:  [12, 41],
		popupAnchor: [1, -34],
		tooltipAnchor: [16, -28],
		shadowSize:  [41, 41]
	});
	var tradeStable = L.icon({
		iconUrl:       'icons/tradeStable.png',
		iconRetinaUrl: 'icons/tradeStable.png',
		shadowUrl:     'icons/shadow.png',
		iconSize:    [25, 41],
		iconAnchor:  [12, 41],
		popupAnchor: [1, -34],
		tooltipAnchor: [16, -28],
		shadowSize:  [41, 41]
	});
	var tradeWatchtower = L.icon({
		iconUrl:       'icons/tradeWatchtower.png',
		iconRetinaUrl: 'icons/tradeWatchtower.png',
		shadowUrl:     'icons/shadow.png',
		iconSize:    [25, 41],
		iconAnchor:  [12, 41],
		popupAnchor: [1, -34],
		tooltipAnchor: [16, -28],
		shadowSize:  [41, 41]
	});

  //Coordinate Finder
/*
  var marker = L.marker([0, 0],  {
  draggable: true,
  }).addTo(map);
  marker.bindPopup('LatLng Marker').openPopup();
  marker.on('dragend', function(e) {
   marker.getPopup().setContent(marker.getLatLng().toString()).openOn(map);
    });
*/

var cityGlaenarm = L.marker([-113.859375, 57.28125], {icon: city}).bindPopup("<b>Glaenarm</b>");
var cityButterpond = L.marker([-126.671875, 35.875], {icon: cityPort}).bindPopup("<b>Butterpond</b>");
var cityNoblar = L.marker([-133.859375, 61.078125], {icon: cityLizard}).bindPopup("<b>Noblar</b>");
var cityYarrow = L.marker([-148.984375, 87.390625], {icon: cityLizard}).bindPopup("<b>Yarrow</b>");
var cityDelarin = L.marker([-158.9375, 63.59375], {icon: cityLizard}).bindPopup("<b>Delarin Stronghold</b>");
var cityReedwater = L.marker([-112.78125, 106.34375], {icon: cityPort}).bindPopup("<b>Reedwater</b>");
var cityLaylaAsari = L.marker([-139.84375, 116.671875], {icon: cityElves}).bindPopup("<b>Layla Asari</b>");
var cityEiflin = L.marker([-141.25, 134.65625], {icon: cityElves}).bindPopup("<b>Eiflin: The Palace Plenty</b>");
var cityHarron = L.marker([-164.78125, 93.34375], {icon: city}).bindPopup("<b>Harron</b>");
var cityTenbrie = L.marker([-179.609375, 92.578125], {icon: cityHalflings}).bindPopup("<b>Tenbrie</b>");
var cityEmyiDorei = L.marker([-121.234375, 126.3125], {icon: cityElves}).bindPopup("<b>Emyi Dorei</b>");
var cityKejgrav = L.marker([-78.6875, 182.1875], {icon: cityBarbarian}).bindPopup("<b>Kejgrav</b>");
var cityBhelThoramE = L.marker([-104.5625, 156.796875], {icon: cityDwarves}).bindPopup("<b>Bhel Thoram</b>");
var cityBhelThoramW = L.marker([-107.21875, 184.15625], {icon: cityDwarves}).bindPopup("<b>Bhel Thoram</b>");
var cityHythe = L.marker([-122.6875, 168.625], {icon: city}).bindPopup("<b>Hythe</b>");
var cityMyrefell = L.marker([-118.53125, 143.0625], {icon: cityPort}).bindPopup("<b>Myrefell</b>");
var cityTorrine = L.marker([-148.09375, 172.296875], {icon: city}).bindPopup("<b>Torrine</b>");
var cityGrasshope = L.marker([-159.515625, 142.5], {icon: cityHalflings}).bindPopup("<b>Grasshope</b>");
var cityPortVenzor = L.marker([-153.578125, 191.65625], {icon: cityPort}).bindPopup("<b>Port Venzor</b>");
var cityBelmare = L.marker([-153.8125, 219.8125], {icon: cityPort}).bindPopup("<b>Belmare: City of Fire</b>");
var cityOrion = L.marker([-107.1875, 193.546875], {icon: cityCapital}).bindPopup("<b>Orion: Capital of Oakla</b>");
var cityPortWormbourne = L.marker([-114.21875, 225.34375], {icon: cityPort}).bindPopup("<b>Port Wormbourne</b>");
var cityOrmskirk = L.marker([-131.40625, 209.6875], {icon: city}).bindPopup("<b>Ormskirk</b>");
var fortFangdor = L.marker([-139.0625, 32.578125], {icon: poiRuin}).bindPopup("<b>Fangdor Fortress</b>");
var fortGoldenPalace = L.marker([-150.125, 74.75], {icon: fort}).bindPopup("<b>The Golden Palace</b>");
var fortWhitebridgePass = L.marker([-131.96875, 96.234375], {icon: fortTower}).bindPopup("<b>Whitebridge Pass</b>");
var fortKniferidge = L.marker([-144.828125, 208.75], {icon: fortTower}).bindPopup("<b>Kniferidge Tower</b>");
var fortPinePalace = L.marker([-131.59375, 193.484375], {icon: fort}).bindPopup("<b>Pine Palace</b>");
var fortEaglecrest = L.marker([-134.5, 211.421875], {icon: poiRuin}).bindPopup("<b>Fort Eaglecrest</b>");
var fortLancerGate = L.marker([-123.9375, 177.546875], {icon: fortTower}).bindPopup("<b>Lancer Gate</b>");
var mageOchri = L.marker([-86.734375, 48.671875], {icon: mageTower}).bindPopup("<b>Ochri College</b>");
var mageCinders = L.marker([-173.640625, 57.703125], {icon: mageTower}).bindPopup("<b>Cinder's College</b>");
var mageSeiche = L.marker([-107.921875, 128.171875], {icon: mageTower}).bindPopup("<b>Seiche College</b>");
var mageThornheart = L.marker([-167.3125, 150.6875], {icon: mageTower}).bindPopup("<b>Thornheart College</b>");
var mageDeeplook = L.marker([-104.234375, 203.21875], {icon: mageTower}).bindPopup("<b>Deeplook College</b>");
var poiTeglhus = L.marker([-92.0625, 50.0625], {icon: poiRuin}).bindPopup("<b>Teglhus</b>");
var poiTheGreatTree = L.marker([-108.234375, 62.78125], {icon: poiBramble}).bindPopup("<b>The Great Tree</b>");
var ruinMistrith = L.marker([-130.890625, 56.5], {icon: poiRuin}).bindPopup("<b>Mistrith Keep</b>");
var poiLacertidCaves = L.marker([-136.9375, 57.265625], {icon: poiCave}).bindPopup("<b>Lacertid Caves</b>");
var poiGurvelOasis = L.marker([-139.625, 63.96875], {icon: poiWaterfall}).bindPopup("<b>Gurvel's Oasis</b>");
var poiGatUll = L.marker([-156.1875, 61.015625], {icon: poiCave}).bindPopup("<b>Gat Ull</b>");
var poiUnknownShrine = L.marker([-124.109375, 105.5], {icon: poiBramble}).bindPopup("<b>Unknown Shrine</b>");
var poiPoolOfSuffering = L.marker([-118.265625, 124.625], {icon: poiBramble}).bindPopup("<b>The Pool of Suffering</b>");
var poiTulivori = L.marker([-156.765625, 132.3125], {icon: poiCave}).bindPopup("<b>Tulivori</b>");
var poiAmspireOasis = L.marker([-156.390625, 120.015625], {icon: poiWaterfall}).bindPopup("<b>Ampsire Oasis</b>");
var poi6 = L.marker([-92.03125, 185.8125], {icon: poiRuin}).bindPopup("<b>??? World Rod</b>");
var poiMountebankForest = L.marker([-132.921875, 179.765625], {icon: poiWaterfall}).bindPopup("<b>Mountebank Forest</b>");
var poiBorosMine = L.marker([-140.4375, 199.90625], {icon: poiMine}).bindPopup("<b>Boros Mine</b>");
var poiKhavarSpring = L.marker([-124, 53.515625], {icon: poiWaterfall}).bindPopup("<b>Khavar Spring</b>");
var templeSootHealer = L.marker([-129.431875, 73.875], {icon: templeMonolith}).bindPopup("<b>The Soot Healer</b>");
var templeDragonPrince = L.marker([-152.1875, 52.53125], {icon: templePyramid}).bindPopup("<b>Pyramid to the First Dragon Prince</b>");
var temple1 = L.marker([-129.546875, 86.078125], {icon: templeCathedral}).bindPopup("<b>Temple of Artamius</b>");
var temple2 = L.marker([-136.609375, 104.765625], {icon: templeZiggurat}).bindPopup("<b>Temple of Mystra</b>");
var templeIslandEldath = L.marker([-134.203125, 131.71875], {icon: templeEldath}).bindPopup("<b>Monastry of the Salt Born, Eldath</b>");
var templeZephora = L.marker([-161.453125, 98.578125], {icon: templeShrine}).bindPopup("<b>Temple of Zephora</b>");
var temple8 = L.marker([-175.078125, 100.140625], {icon: templeCathedral}).bindPopup("<b>Temple of Gao</b>");
var temple3 = L.marker([-82.0625, 200.171875], {icon: templeShrine}).bindPopup("<b>Temple to the Frost Guard</b>");
var templeTupana = L.marker([-91, 168.71875], {icon: templeMonolith}).bindPopup("<b>Temple of Tupana</b>");
var templeOfEldath = L.marker([-130.859375, 135.625], {icon: templeEldath}).bindPopup("<b>High Temple of Eldath</b>");
var temple4 = L.marker([-164.96875, 180.03125], {icon: templeShrine}).bindPopup("<b>Temple of Idola</b>");
var templeKelemvor = L.marker([-138.53125, 189.5], {icon: templeMonolith}).bindPopup("<b>Shrine of Kelemvor</b>");
var townGulndar = L.marker([-99.453125, 47.625], {icon: cityDruid}).bindPopup("<b>Gulndar</b>");
var townForestDruids = L.marker([-102.84375, 61.5625], {icon: townDruid}).bindPopup("<b>Forest Druids</b>");
var townWesthaven = L.marker([-114.46875, 43.90625], {icon: townDock}).bindPopup("<b>Westhaven</b>");
var townMirstone = L.marker([-117.6875, 76.78125], {icon: townDock}).bindPopup("<b>Mirstone</b>");
var townZimban = L.marker([-142.28125, 46.3125], {icon: townLizard}).bindPopup("<b>Zimban</b>");
var townTelKibil = L.marker([-144.859375, 66.734375], {icon: townLizard}).bindPopup("<b>Tel Kibil</b>");
var townAnkoret = L.marker([-152.21875, 55.6875], {icon: townLizard}).bindPopup("<b>Ankoret</b>");
var townSaradim = L.marker([-159.1875, 46.078125], {icon: townLizard}).bindPopup("<b>Saradim</b>");
var townNythiAsari = L.marker([-148.421875, 106.796875], {icon: townElves}).bindPopup("<b>Nythi Asari</b>");
var townPortKhel = L.marker([-151.15625, 130.96875], {icon: townBarbarian}).bindPopup("<b>Port Khel</b>");
var townPortCulux = L.marker([-163.5, 114], {icon: townBarbarian}).bindPopup("<b>Port Culux</b>");
var townNaeborn = L.marker([-92.03125, 208.125], {icon: townBarbarian}).bindPopup("<b>Naeborn</b>");
var townGarDural = L.marker([-109.890625, 171.3125], {icon: townDwarves}).bindPopup("<b>Gar Dural</b>");
var townKelgrum = L.marker([-96.328125, 166.234375], {icon: townDwarves}).bindPopup("<b>Kelgrum</b>");
var townErast = L.marker([-156.21875, 171.875], {icon: town}).bindPopup("<b>Erast</b>");
var townGuthram = L.marker([-132.296875, 168.9375], {icon: townMill}).bindPopup("<b>Guthram</b>");
var townGreenflower = L.marker([-163.796875, 184.734375], {icon: townHalflings}).bindPopup("<b>Greenflower</b>");
var townAnyor = L.marker([-140.171875, 212.734375], {icon: town}).bindPopup("<b>Anyor</b>");
var townBrambleWoods = L.marker([-125.015625, 183.59375], {icon: town}).bindPopup("<b>Bramble Woods</b>");
var townNuxvar = L.marker([-112.796875, 204.84375], {icon: town}).bindPopup("<b>Nuxvar</b>");
var townTamsworth = L.marker([-112.53125, 215.8125], {icon: town}).bindPopup("<b>Tamsworth</b>");
var tradePirnPost = L.marker([-120.6875, 60.6875], {icon: tradeWatchtower}).bindPopup("<b>Pirn Post</b>");
var tradeHommet = L.marker([-137.890625, 55.375], {icon: tradeCampLarge}).bindPopup("<b>Hommet's Trading Post</b>");
var tradeBulasiStables = L.marker([-164.34375, 55.84375], {icon: tradeStable}).bindPopup("<b>Bulasi Stables</b>");
var tradeDasbury = L.marker([-142.015625, 95.921875], {icon: tradeHunter}).bindPopup("<b>Dasbury Post</b>");
var tradeRukuleCross = L.marker([-88.375, 193.609375], {icon: tradeHunter}).bindPopup("<b>Rukule Cross</b>");
var tradeGilnium = L.marker([-101.546875, 212.078125], {icon: tradeHunter}).bindPopup("<b>Gilnium Forest</b>");
var tradeThoramForge = L.marker([-106.796875, 154.859375], {icon: tradeForge}).bindPopup("<b>Thoram Forge</b>");
var tradeNockedArrow = L.marker([-130.28125, 158.953125], {icon: tradeHunter}).bindPopup("<b>The Nocked Arrow</b>");
var tradeJarrensOutpost = L.marker([-117.671875, 153.1875], {icon: tradeWatchtower}).bindPopup("<b>Jarren's Outpost</b>");
var tradeHealthyHorse = L.marker([-137.84375, 171.015625], {icon: tradeStable}).bindPopup("<b>The Healthy Horse Post</b>");
var tradeEastcliffCrossroad = L.marker([-150.5, 152.203125], {icon: tradeCampLarge}).bindPopup("<b>Eastcliff Crossroad</b>");
var tradeAnyorPost = L.marker([-136.75, 220.578125], {icon: tradeCamp}).bindPopup("<b>Aynor Post</b>");
var tradeSkysteadNook = L.marker([-113.75, 187.203125], {icon: tradeCampLarge}).bindPopup("<b>Skystead Nook</b>");
var tradeGarenWell = L.marker([-123.125, 205.359375], {icon: tradeStable}).bindPopup("<b>Garen's Well</b>");
var cityBallymena = L.marker([-139.296875, 151.796875], {icon: city}).bindPopup("<b>Ballymena</b>");

//Marker Groups
  var groupCities = L.layerGroup([cityGlaenarm,cityBallymena,cityButterpond,cityNoblar,cityYarrow,cityDelarin,cityReedwater,cityLaylaAsari,cityEiflin,cityHarron,cityTenbrie,cityEmyiDorei,cityKejgrav,cityBhelThoramE,cityBhelThoramW,cityHythe,cityMyrefell,cityTorrine,cityGrasshope,cityPortVenzor,cityBelmare,cityOrion,cityPortWormbourne,cityOrmskirk]);
  var groupTowns  = L.layerGroup([townGulndar,townForestDruids,townWesthaven,townMirstone,townZimban,townTelKibil,townAnkoret,townSaradim,townNythiAsari,townPortKhel,townPortCulux,townNaeborn,townTamsworth,townNuxvar,townAnyor,townGreenflower,townErast,townGuthram,townBrambleWoods,townGarDural,townKelgrum]);
  var groupTradingPosts = L.layerGroup([tradePirnPost,tradeHommet,tradeBulasiStables,tradeDasbury,tradeRukuleCross,tradeGilnium,tradeThoramForge,tradeNockedArrow,tradeJarrensOutpost,tradeHealthyHorse,tradeEastcliffCrossroad,tradeAnyorPost,tradeSkysteadNook,tradeGarenWell]);
  var groupForts  = L.layerGroup([fortFangdor,fortGoldenPalace,fortWhitebridgePass,fortKniferidge,fortPinePalace,fortEaglecrest,fortLancerGate]);
  var groupTemples = L.layerGroup([templeSootHealer,temple8,temple1,temple2,templeZephora,temple3,templeTupana,templeKelemvor,temple4,templeOfEldath,templeIslandEldath,templeDragonPrince]);
  var groupMageTowers  = L.layerGroup([mageOchri,mageCinders,mageSeiche,mageDeeplook,mageThornheart]);
  var groupPOI  = L.layerGroup([poiTeglhus,poiTheGreatTree,ruinMistrith,poiLacertidCaves,poiGurvelOasis,poiGatUll,poiUnknownShrine,poiPoolOfSuffering,poiTulivori,poiAmspireOasis,poi6,poiMountebankForest,poiBorosMine,poiKhavarSpring]);

//Marker Overlay
  var overlays={
    "Cities" : groupCities,
    "Towns" : groupTowns,
    "Trading Posts" : groupTradingPosts,
    "Forts" : groupForts,
    "Temples" : groupTemples,
    "Mage Towers" : groupMageTowers,
	"Points of Interest" : groupPOI,
    }

//GROUP CONTROLS
  L.control.layers(null, overlays).addTo(map);

L.control.scale({metric: false, maxWidth: 250}).addTo(map);

    </script>
  </body>
</html>