HomeKit IR Blaster: Homebridge Plugin
You can probably tell I’m a fan of Home Automation and have a full suite of Zigbee lights throughout my house. However, controlling lights is only the first step of many to an automated household. The next stage in automation for me was dealing with the eternal dilemma of finding the remote—an IR Blaster.
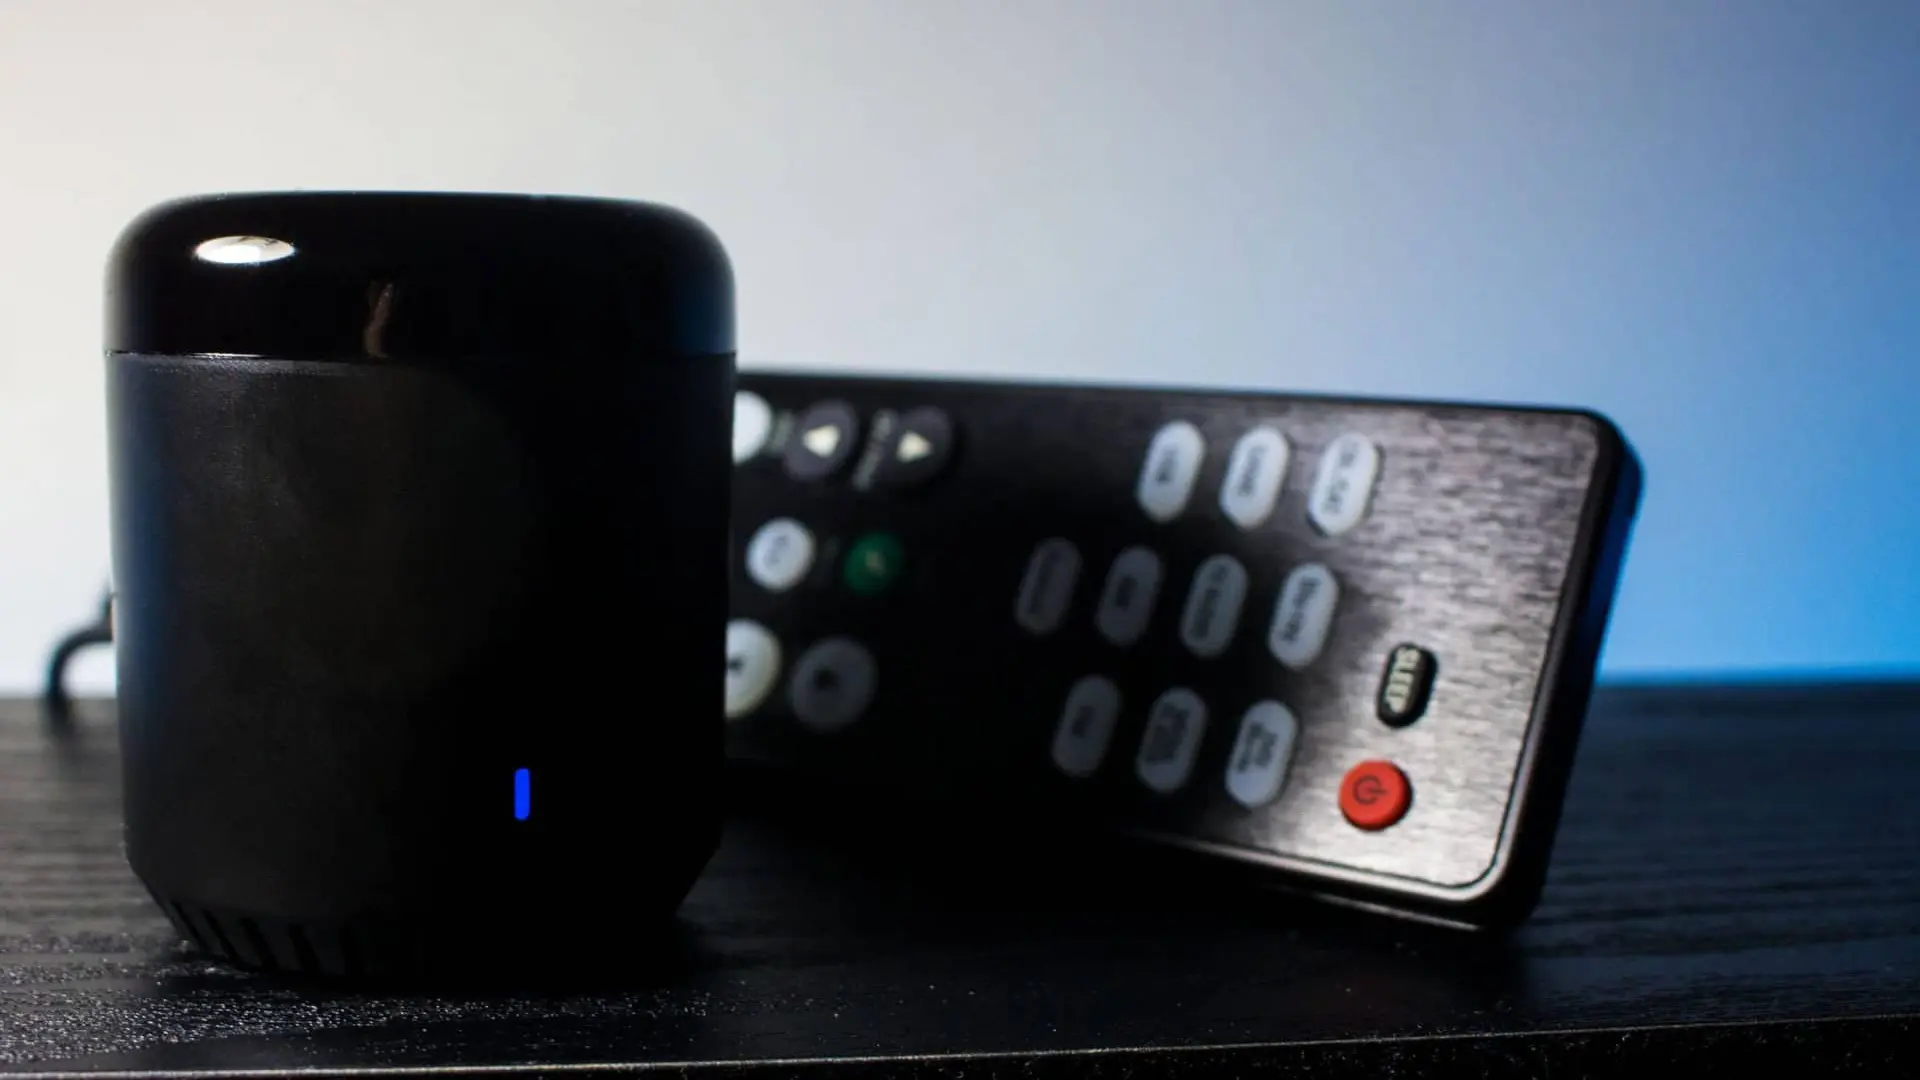
I started researching IR Blasters, but couldn’t find any that supported HomeKit. This meant I’d be looking for something in the Homebridge realm. Here, I found three options: The Logitech Harmony Hub, the BroadLink RM, or I could code an ESP2866 as an HTTP IR Blaster. I went with a BroadLink RM Mini 3—a more budget-savvy ~£18 (~$24) compared to the ~£75 (~$70) Harmony Hub.
Initial App Setup
When trying to connect the IR Blaster in the app, I had a few teething issues. It refused to discover the BroadLink RM Mini, and so had to use the app’s alternative connection method. This involved connecting to the BroadLink as a Wi-Fi Network and using that to connect it to my network.
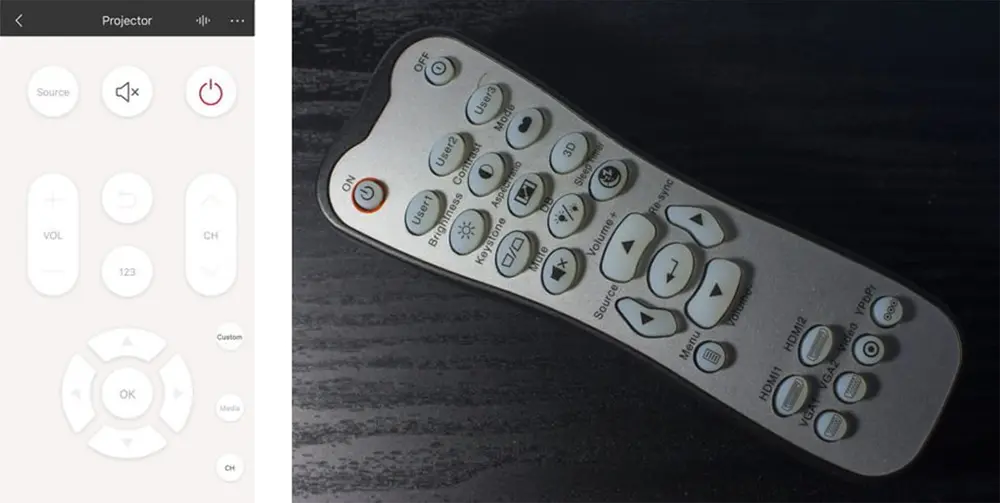
I did have a look at what the Native app offered—in case my Homebridge system ever stopped working. For me the app was a 4/10, missing a few key features I needed, such as the option for separate On/Off commands.
Homebridge Setup
Luckily, the Native App was never the end goal for this project. I needed to expose it to HomeKit. The plugin for getting the Broadlink to work with Homebridge is homebridge-broadlink-rm.
To install this type, the below command on your server:
sudo npm install -g homebridge-broadlink-rmOnce installed you can configure the plugin. The first step is to add the Broadlink Plugin to the config.json file. You will want to add the below code to the file—if you have other platforms add this as an extra:
"platforms": [
{
      "platform":"BroadlinkRM",
      "name":"Broadlink RM",
      "hideScanFrequencyButton": true,
      "hideLearnButton": false,
      "hideWelcomeMessage": true,
      "accessories":[ ]
    }
]
Save this and start Homebridge. There should now be an extra button on your Home App labelled ‘Learn’. When you press this button, the Broadlink will start listening for input. If you press a button on the remote, the IR code will appear in the Homebridge console. You will need to press the learn button again for each IR code.

You’ll need to save each of these commands and make a list of each button and its code. I’m using PuTTY to connect to my Pi. By using this method, you can create a list of all the IR codes you want. I recommend turning off your TV/device to stop the device from responding to all the inputs!
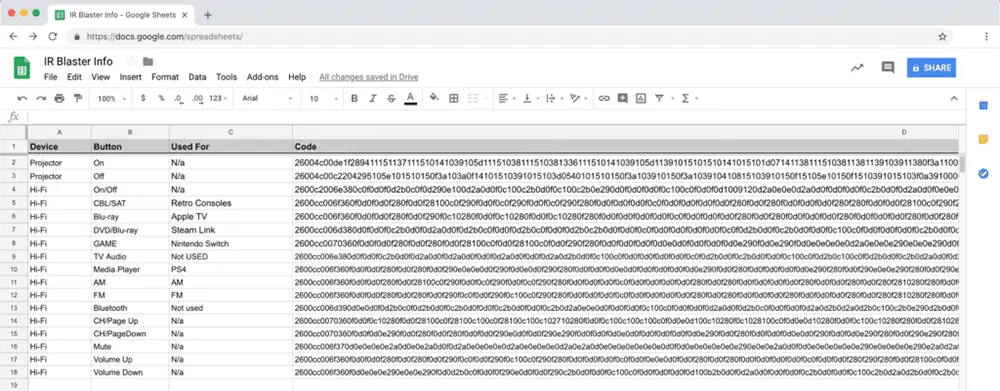
Once you’ve got your list of IR codes written, you can start adding them to the config.json file. The next thing to do is to change “hideLearnButton” to false—you won’t need this again unless you add more remotes. For most of the commands, you add you will follow the simple structure of:
"platforms": [
    {
      "platform":"BroadlinkRM",
      "name":"Broadlink RM",
      "hideScanFrequencyButton": true,
      "hideLearnButton": true,
      "hideWelcomeMessage": true,
      "accessories":[
              {
                "name": "Hi-Fi",
                "type": "switch",
                "data": {
                  "on": "2600c2006e380...(ON_HEX_CODE)",
                  "off": "2600c2006e380...(OFF_HEX_CODE)"
                }
              }
            ]
This will be the structure for most of the remotes you will add to Homebridge. However, I had some special requirements. For my projector, as it has a separate on and off commands, and the off button needs to be pressed twice to turn off. To do this, I looked at the plugins Advanced Hex Structures. Here I found the syntax for the repeat commands. For my projector’s functionality, I used the following:
"name": "Projector",
"type": "switch",
"data": {
    "on": "26004c00de1f2...(ON_HEX_CODE)",
    "off": [
      {
        "data": "26004c00c2204...(OFF_HEX_CODE)",
        "sendCount": 2,
        "interval": 0.3
      }
    ]
  }
Once you’ve added the different IR codes, you can then save out the config.json file and start Homebridge. I often end up with one or two minor errors in the syntax, so recommend putting your config through a parser. I’ve also included my full code for the Broadlink plugin at the bottom of this post.
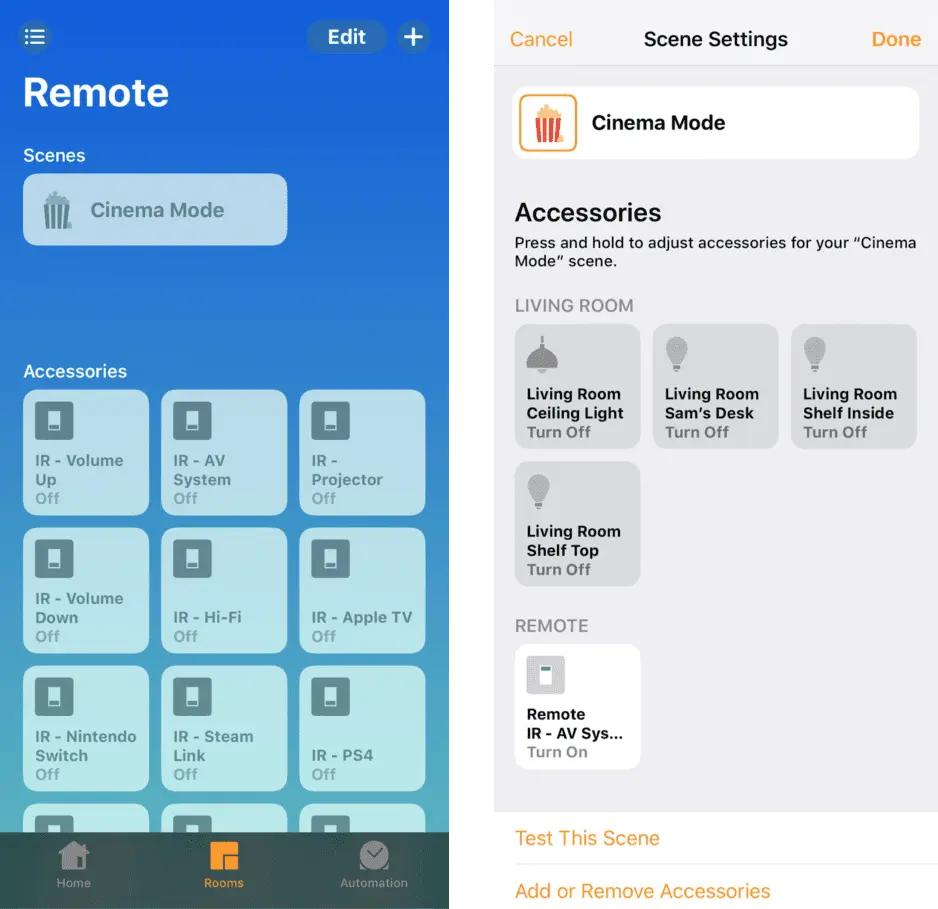
I also added an AV System button, this turns on both the projector and hi-fi. I made this as a single button, as experienced issues trying to send two IR codes at the same time via a HomeKit scene.
For me, this project was to replace my remote controls, but it works with anything IR controlled—such as an air conditioner or desk fan. If you have questions about the project, I’d be more than happy to answer them!
My Broadlink Code
{
             "platform": "BroadlinkRM",
             "name": "Broadlink RM",
             "hideScanFrequencyButton": true,
             "hideLearnButton": true,
             "hideWelcomeMessage": true,
             "accessories": [{
                     "name": "IR - AV System",
                     "type": "switch",
                     "data": {
                         "on": [{
                             "data": "260050...",
                             "sendCount": 2,
                             "interval": 0.5,
                             "pause": 1
                             },{
                             "data": "2600c2..."
                         }],
                         "off": [{
                             "data": "260050...",
                                 "sendCount": 2,
                                 "interval": 0.3
                             },{
                             "data": "2600c2..."
                             }]
                         }
                     },
                     {
                     "name": "IR - Projector",
                     "type": "switch",
                     "data": {
                         "on": "260050...",
                         "off": [{
                                 "data": "260050...",
                                 "sendCount": 2,
                                 "interval": 0.3
                             }]
                         }
                 },
                 {
                     "name": "IR - Hi-Fi",
                     "type": "switch",
                     "data": {
                         "on": "2600c2...",
                         "off": "2600c2..."
                     }
                 },
                 {
                     "name": "IR - Apple TV",
                     "type": "switch",
                     "data": "2600cc..",
                     "enableAutoOff": true,
                     "onDuration": 0.1
                 },
                 {
                     "name": "IR - Steam Link",
                     "type": "switch",
                     "data": "2600cc...",
                     "enableAutoOff": true,
                     "onDuration": 0.1
                 },
                 {
                     "name": "IR - Nintendo Switch",
                     "type": "switch",
                     "data": "2600cc...",
                     "enableAutoOff": true,
                     "onDuration": 0.1
                 },
                 {
                     "name": "IR - PS4",
                     "type": "switch",
                     "data": "2600cc...",
                     "enableAutoOff": true,
                     "onDuration": 0.1
                 },
                 {
                     "name": "IR - Volume Up",
                     "type": "switch",
                     "enableAutoOff": true,
                     "onDuration": 0.9,
                     "data": [{
                             "data": "2600cc...",
                             "sendCount": 3,
                             "interval": 0.3
                         }]
                 },
                 {
                     "name": "IR - Volume Down",
                     "type": "switch",
                     "enableAutoOff": true,
                     "onDuration": 0.9,
                     "data": [{
                             "data": "2600cc...",
                             "sendCount": 3,
                             "interval": 0.3
                         }]
                 }
             ]
         }
Featured Equipment
As an Amazon Associate, TechTrail earns from qualifying purchases made with some store links.