This guide should work for any IP camera that outputs an RTSP/RTMP stream, but there may be some differences from the camera that I’m using within this guide.
Before getting started I recommend setting a static IP for your IP camera. You can do this on almost all routers, but the steps will be different. Just search the name of your router + ‘DHCP assignment’ and follow the instructions presented!
After setting a static IP you’ll want to jump onto your Raspberry Pi running Homebridge. If you havenβt already got a Homebridge setup, check out my previous post.
Homebridge Setup
Previously you would need to install FFmpeg separately, but this is now included within homebridge-camera-ffmpeg plugin. To install this plugin, run the following command:
sudo npm install -g homebridge-camera-ffmpeg --unsafe-perm
Before adding the plugin to Homebridge you’ll want to find out the RTSP stream URL for your camera. Getting this will differ slightly between the camera you have, for the camera that I am using the way to do this is as follows:
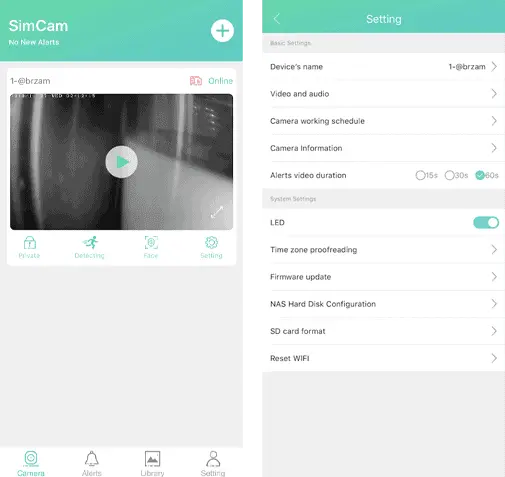
- Open the SimCam app and press the Settings cog on the camera you want to add.
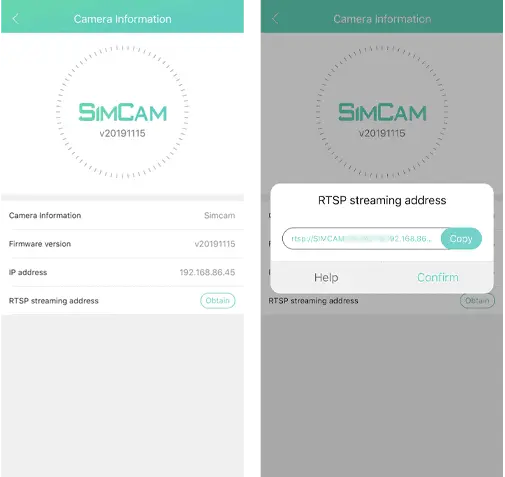
- From this list, select ‘Camera Information’.
- Press the ‘Obtain’ button on the option ‘RTSP streaming address’
- Write down this URL, as you will need to include it in your config.json.

Now you have the RTSP URL, open your config.json and add the following code underneath the platforms header. Substituting RTSP URL for the RTSP URL you just copied.
{ "platform": "Camera-ffmpeg", "cameras" [{ "name": "Camera Name", "manufacturer": "Manufacturer", "model": "Model", "videoConfig": { "source": "-re -i RTSP URL", "videoFilter": "none", "vcodec": "copy", "maxBitrate": 200, "packetSize": 1128 } } ] }
The above config is what I’ve found works best for my IP Camera, giving me a low latency feed both at home and away. You may want to change the Camera Name as this is what will appear in HomeKit.
After saving your config.json restart Homebridge. After restarting, the camera won’t immediately appear in HomeKit, this is because it needs to be added directly.

If you’re running Homebridge as a systemctl and can’t see this log, the setup code is the same as your main Homebridge pin.
To add the camera to your HomeKit system:
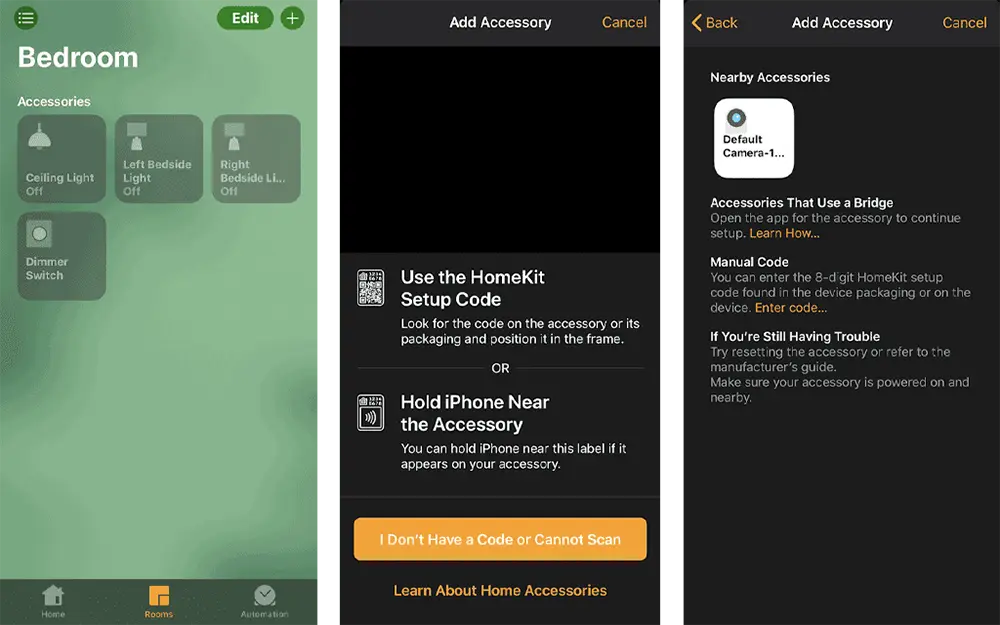
- Open the HomeKit app and press the + button.
- Select the option ‘I Don’t Have a Code or Cannot Scan’.
- Your SimCam camera will be listed at the top under ‘Nearby Devices’ click on the camera’s icon.
- Enter your Homebridge Code.

After adding the camera it will appear at the bottom of your favourites page, and when full-screening the camera it loads quickly! You can also see what output quality and settings Homebridge is sending in the Homebridge Log.

Overall I’m extremely happy with the end results of this little project! It has definitely improved the usefulness of the SimCam cameras for me, and my grand quest to have any and all smart products I buy appear in the Apple HomeKit app. If you have any questions about this setup please drop me a comment below and I’d be more than happy to answer them!

by Sam Brooks
Sam is the founder and editor for Tech Trail. With a background in Broadcast Engineering, and great enthusiasm for smart home and emerging technologies.
Hi Sam, great tutorial!
Was wondering if it’s possible to add extra features to the homebridge app as motion detection and face recogniction through the config.json?
Thanks
Arsen
Always happy to help! To get these features a SimCam specific plugin would need to be created, whilst this is extremely possible I don’t think anyone has done the groundwork to connect the Homebridge and SimCam APIs. However, after a bit of googling I did find this homebridge plugin (https://github.com/rxseger/homebridge-camera-motion/blob/master/README.md) that could accomplish the motion detection independantly of the SimCam’s detection. Although I’ve not had any experience with it.
If you do go down this route let me know how it goes! π
Cool tutorial, just an FYI, don’t set your packet size so low (188 bytes) as you will increase your network overhead unnecessarily. Even when tunnelling through a VPNs etc you should be able to get away with a much more efficient 1128. Even the default of 1316 should be good for 99% of users.
Ahh thanks for the tip, Iβve updated the above! ?
Small update: http://git.videolan.org/git/x264 is no longer available, new URL: https://code.videolan.org/videolan/x264
Thanks for letting me know! I’ve updated the above π
Great guide got me up and running in no time (Well, barring the ffmpeg compilation time.)
I did want to mention a few things I ran into while doing it to a RaspberryPi 0w yesterday.
for the Configure command for ffmpeg, I had to add the –extra-ldflags=”-latomic” as I was getting a linker error to the atomics during the make:
./configure –arch=armel –target-os=linux –enable-gpl –enable-libx264 –enable-nonfree –extra-ldflags=”-latomic”
Also for the make -j 1 did not work for me, whereas a simple make with no parameter did successfully compile. I’m still a linux noob so not entirely sure why.
But relatively easy fixes to get me going, wanted to mention it in case anyone else ran into the issues.
Thanks again for the great guide!
-John M.
Also forgot to mention while adding the RTSP camera in the HomeBridge/ Hoobs configuration of the Cameras element of the ffmpeg config where you define your cameras and use these config settings, I also had to use the setting:
“unbridge” : true to stop HomeKit from being able to notice the camera can be added directly to HomeKit. With it off it sees it as a stand-alone rtsp cam and wonβt trigger the eufy device to not add itself in.
Have you tried configuring one Pi with Homebridge pulling multiple RTSP camera feeds?
I have indeed! It depends on how much processing you do on the streams. But for the most part, if it’s just pass through, it can handle a few.